Sunday, October 21, 2012

Tunisian stitch scarf

So I found a tutorial for the tunisian stitch, which I've been seeing around recently and I thought it would be great to give it a try. Usually you would just make a bunch of different colored squares and then join them together to make a blanket. Well, I had this multicolored yarn from Red Hook (called Woodsie), and I didn't know what else to do with it. After a few trial squares I decided to just keep going with one and make a scarf with it. This one was 17 chains wide. I don't have a tunisian crochet hook, so that's as many as I could fit onto my regular hook. The ends still curl, so I might add some brown fringe to it (I used the whole skein on the scarf). I think it's about 7 feet long too. But I love the pattern in this.

I made the pic somewhat large so you could see the pattern, but all of a sudden when I send pics to here from my phone, they don't come out as clear anymore. Bummer.


But anyways, you can find the totally awesome and easy to follow tutorial here, and she also has posts on other variations of the stitch. The cross stitch version is also fun to try.

Happy Crocheting!  :)


Hook Caddy - Tutorial

After going through many online patterns of crochet hook caddies, I was unable to find one that I like. So, I decided to design my own. This is starting to become the norm for me..

Originally, I wanted a roll-up design, and that was how this one started out. But then I couldn't figure out how to make holders for the hooks. In my head it all worked out perfectly. When I tried to do it, well.. not so much.  So it ended up being more of an envelope design. Not sure if I want to keep this or not, but I don't have a way to sell it and I don't know anyone else that crochets that I can give it to. But for now, it holds my hooks, so it's not completely useless. Although I suggest if anyone does decide to use this pattern, make it longer, because when I fold the top over, the needles aren't covered, so I had to put then horizontally up closer to the hooks. I also sewed on a little button that goes through one of the hdc holes, but it does pull it a bit.

So here is my pattern:

Yarn used:
Color A - Lion Brand Grey
Color B - Lion Brand Navy blue

Size H hook

Foundation: chain 46 (again, make this longer if you want the top to fold over more, maybe about 10 additional chains)

Row 1: hdc in 3rd ch from hook (counts as first hdc), hdc in every ch across

Row 2: ch 2, turn, hdc every ch across

Row 3: change to color B, ch 2, turn, hdc every ch across (I didn't tie off after each row, I just carried each color along and switched it every two rows, then there are less ends to tie off)

Keep repeating this pattern, changing colors every two rows

Row 19: ch 1, turn, sc every ch across

Tie off and weave in ends


Next, fold up the end that has the carried-over yarn. Sew both edges to form a big pocket.
*Although it might be easier to sew one edge, then the other rows, then the last edge (I realized later)*
Sew the pocket together in between each color. This makes the little pockets for each hook. They will stretch a bit for the bigger sizes. I did somewhat of a loopy stitch, where I would tie the knot at the bottom, bring the need up two holes forward, then go down the hole I skipped, then up two holes forward, then down the one I skipped and so forth. Does that make sense?
Once each pocket is done, weave in ends.

Optional: I did a few stitches along the bottom just to keep the smaller hooks from sliding out. They do tend to poke through the top sometimes though, but oh well.

For the small needles, just poke them though loops already made by the hdc's. If the top flap was longer it would cover them the way I have it shown in my picture, but since its not, I had to put them up closer to the hooks. I just didn't like the way you could still see them hanging out the bottom. But maybe I'll make a flap extension.

Not shown in the picture, I also added a small button centered near the bottom. Make sure you pick one small enough to fit through one of the loops made from the hdc.


 Question or comments? Please let me know!

Happy Crocheting!  :)


Friday, October 19, 2012

Long Skinny Crossed Scarf - Tutorial


So here is yet another scarf. I had some trouble starting this out, as you can see from the notes, but I managed to figure something out that more or less seemed to work.

Yarn: Red Hook Fiesta (I think this is discontinued) - 1 skein
Hook size L

treble or triple crochet: yo 2x, insert in ch, yo, pull thru, yo draw thru 2 loops, yo draw thru 2 loops, yo draw thru 2 loops
 
Foundation: chain 18
 
Row 1: dc 3rd ch from hk (counts as first dc) and every ch across (16 dc's)

Row 2: ch 3, turn (counts as first dc), dc in every ch

Row 3: ch 3, turn (counts as first tc), *skip ch, tc, go back to skipped ch, tc (makes an 'x'), repeat from * 6 more times (should be 7 x's). On last chain, normal tc

Row 4 & 5: repeat row 2

Row 6: repeat row 3

Keep repeating rows until desired length

Last row: after two rows of dc's, ch 1, sc every ch across, tie off and weave in ends


I also tried to draw out a diagram for this scarf as well, as seen below. Not really the best, but it gives you kind of a visual as to how it looks.

 o = sc
T = dc
8/o & 8/0 = chain 3
| = normal tc
X = tc cross
-* = start
*- = end
 
*-oooooooooooooooo 
oTTTTTTTTTTTTTTT8
 8TTTTTTTTTTTTTTTo
 0 X  X  X  X  X  X  X |8
 oTTTTTTTTTTTTTTT8
 8TTTTTTTTTTTTTTTo
 8| X  X  X  X  X  X  X 0
 oTTTTTTTTTTTTTTT8
 8TTTTTTTTTTTTTTTo
 0 X  X  X  X  X  X  X |8
 oTTTTTTTTTTTTTTT8
 8TTTTTTTTTTTTTTTo
 8| X  X  X  X  X  X  X 0
 oTTTTTTTTTTTTTTT8
 8TTTTTTTTTTTTTTTo
 0 X  X  X  X  X  X  X |8
 oTTTTTTTTTTTTTTT8
 8TTTTTTTTTTTTTTTo
 8| X  X  X  X  X  X  X 0
 oTTTTTTTTTTTTTTT8
 8TTTTTTTTTTTTTTTo
-*ooooooooooooooo8


If you have any questions or comments please let me know!  :)

Happy Crocheting!

Monday, October 15, 2012

Recent projects

This is what I've completed in the last week or two.
There will be tutorials for the skinny scarf, the hook caddy, the hooded scarf, and maybe the domo phone case, so check back.  :)


Wednesday, October 3, 2012

Rowan bag

I love the way this came out. It was a challenge tho; I didn't follow the pattern all the way thru, things didn't line up right, I ran out of green yarn.. It took a little while to finish this. But next time I go to CT my mom will help me sew in a liner and I'm thinking about maybe putting in something to help it keep its shape. Not sure yet.

I'll try to find the link and post it. I know it was a pdf from the ravelry.com website.


Tuesday, October 2, 2012

Puff Scarf & Hat Set

Scarf & Hat Set

Yarn used: 1 skein each of Red Heart Soft Baby Steps (medium worsted weight, 5oz., 256yds.)

Color A: Pink
Color B: Blue


Puff stitch: [YO, insert hook in space, YO, draw thru] (3x), YO, draw thru 6 loops on hook, YO, draw thru 2 loops on hook.
For a bigger puff, do first step 4x, YO and draw thru 8 loops instead of 6
 

Scarf:

Foundation: chain 26.
Row 1: with color A, sc third ch from hook and in every ch across (24 sc)
 

Row 2: ch 3, turn, puff stitch in first ch, *ch 1, skip 1 ch then puff stitch in next* repeat from * across (13 puff stitches)
 

Row 3: ch 3, turn, puff st in each ch sp across, with ch-1 in between, last puff stitch between puff and ch-3 sp (13 puffs total)
 

Row 4 - 7: repeat row 3


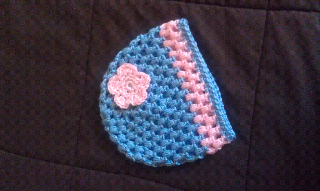
Row 8: should have 6 rows of puff stitches; leave a tail to tie off later, and switch to color B [see pic]. Repeat row 3 again, for three rows. (Rows 8, 9, 10)


Row 11: switch back to color A, and resume pattern *ch 1, skip 1 ch then puff stitch in next*

Row 12 - 55: keep pattern
Row 56: switch to color B again for 3 rows
Row 59: switch to color A for last 6 rows
Row 64: ch 1, sc every ch across, tie off and weave in ends

(I came up short on yarn so I only had 5 pink rows at the end, but its not too noticeable; to fix this, leave out one row in the middle section so you have enough for the last six rows)

*note: results may vary; I kept a loose puff stitch so that uses more yarn; smaller and tighter puffs will use less, giving you a longer scarf if you want, but bigger or looser puffs will use more yarn so it will be shorter**


Hat:

(Original pattern from [http://www.michaels.com/Loops-Threads%E2%84%A2-Crochet-Hat-and-Scarf-Set/e08020,default,pd.html], but altered as below:

Instructions
Note: Ch 2 at beg of row does not count as st.

Ch 4 with color B. Join in ring.
1st rnd: [(Yoh and draw up a loop) 3 times in indicated st. Yoh and draw through all loops on hook - Puff st made. Ch 1] 6 times in ring. Join to first Puff St.
2nd rnd: Ch 2. *(Puff St. Ch 1) twice in next ch-1 sp. Rep from * around. Join.
3rd rnd: Ch 2. *(Puff St. Ch 1) twice in next ch-1 sp. Puff St in next ch-1 sp. Ch 1. Rep from * around. Join.
4th rnd: Ch 2. *Puff St in next ch-1 sp. Ch 1. Rep from * around. Join.
5th rnd: Ch 2. *(Puff St. Ch 1) twice in next ch-1 sp. (Puff St in next ch-1 sp. Ch 1) twice. Rep from * around. Join.
6th rnd: same as 4th rnd
7th rnd: Ch 2. *(Puff St. Ch 1) twice in next ch-1 sp. (Puff St in next ch-1 sp. Ch 1) 3 times. Rep from * around. Join. 30 Puff Sts.
8th, 9th, 10th rnd: same as 4th rnd
11th rnd: switch to color A, repeat 4th rds
12th rnd: same as 4th rnd
13th rnd: switch to color B, same as 4th rnd
14th & 15th rnd: puff stitch every ch-1 space, no ch-1 in between
16th rnd: hdc every ch, join, fasten off

(When finished, this hat fit me, and I figured it was way to big for a 6-year-old. I'll post the changes below)

1st - 5th rnd: stays the same
6th - 11th rnd: Ch 2. *Puff St in next ch-1 sp. Ch 1. Rep from * around. Join.
12th rnd: change to color A, repeat previous rnds
13th rnd: repeat rnd
14th rnd: change back to color B, ch 1, sc every chain around
15th rnd: ch 1, sc every ch around, tie off and weave in ends
Flower motif found here: http://www.woolcrafting.com/crochet-flower-pattern.html
(ran out of pink yarn so I stopped after rnd 4)

When finished, sl st to center of flower, and tie onto a puff stitch (I used a needle and wrapped it a few times so it won't spin or come loose)